01
Before you begin
Keep these instructions for future reference. This English web adaptation translates the installation, use and care information in the Italian manufacturer manual. It covers the 230V ~ 50Hz European models with a Type C Europlug. For another regional version or a white-label product, follow the instructions supplied with that product.
In the box
- One ReptiRad radiant heat panel.
- One power cable with an EU Type C Europlug and C8/C7 male/female inline connection.
- One mounting kit containing six screws.
- One QR-code label linking to installation and operating instructions.
If anything is missing or damaged, do not install the panel. Contact your retailer or the manufacturer.
You will also need
A compatible dimming or pulse-proportional thermostat, a compatible temperature probe if not supplied with the thermostat, and tools suitable for securing the panel to the enclosure ceiling. These are not included.
General safety
- Indoor use only. Use only for its intended purpose and check that the supply matches the voltage on the product.
- Do not use a damaged panel, plug or cable. Do not leave the appliance connected unnecessarily.
- Unplug before cleaning. Never immerse the panel in water or other liquids.
- Keep out of children’s reach. The manual excludes use by people with reduced mental or sensory capabilities, or without adequate instruction in safe use.
- Never open the panel. A damaged supply cable must be replaced by the manufacturer, its service agent or a similarly qualified person.
- The panel has no power switch. Supply it through the required compatible thermostat; disconnect the mains supply before handling connections.
02
Position & mounting
Mount on the enclosure ceiling only, preferably towards one end to create a warm zone and a cooler zone. Check the requirements of the species you keep.
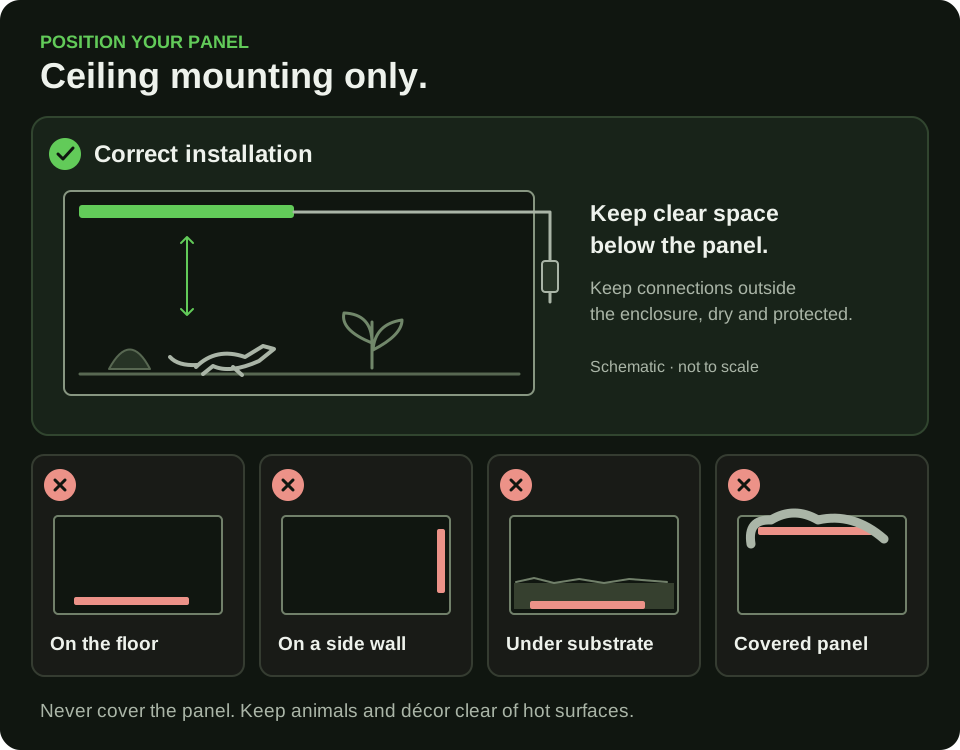
- With the mains supply disconnected, separate the power cable at the inline connector.
- Secure the panel using every mounting hole: four or six, depending on the model, with the supplied screws. Ensure it is stable and that fitting does not damage the enclosure or panel.
- Route the cable out of the enclosure. Keep the inline connection, plug and all other electrical connections outside, dry and protected.
- Reconnect the inline connector as described below, while the mains supply remains disconnected.
The panel is 18.5mm thick. If using a protective guard, ensure it is compatible and does not interfere with operation or heat dissipation. Prevent the animal from touching dangerously hot surfaces, reaching cables or applying force to the panel.
03
Electrical connections
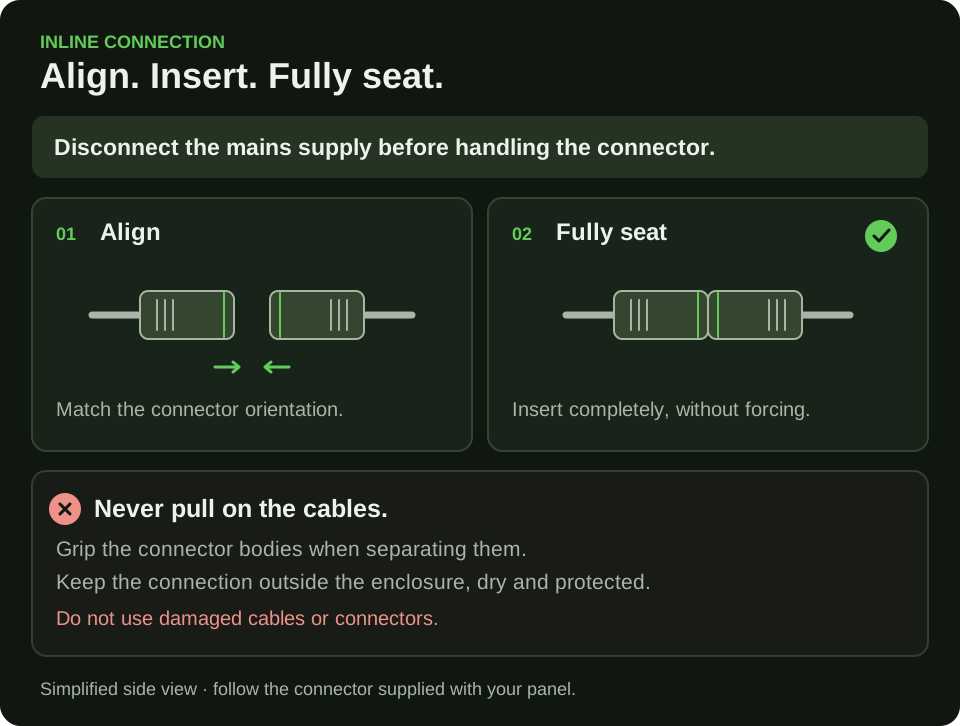
- Use only the connectors specified by the manufacturer. Align the male and female parts correctly and insert fully without forcing.
- Do not use damaged cables or connectors. Do not open, modify or tamper with them.
- Do not pull on the cables to disconnect. Avoid cable tension and mechanical strain during use.
- Protect the connection from water and moisture, unless its specified protection rating expressly permits otherwise. Keep all connections outside the enclosure.
Connecting the plug
Check for visible damage, cuts or exposed wires and ensure the plug pins are straight and parallel. Check socket compatibility. Hold the insulated plug body, align the pins and push straight into the compatible thermostat outlet until fully seated, with no exposed metal pins. Grip the plug body when removing it; never pull the flexible cable. Follow the thermostat manufacturer’s instructions for its connection to the mains.
04
Thermostat & probe placement
Connect ReptiRad to the output of a compatible dimming or pulse-proportional thermostat, following its manufacturer’s instructions. Confirm the thermostat supports the voltage and power of the panel. If connecting more than one device, their total power must not exceed the thermostat’s maximum permitted load.
Position the probe directly below the panel, at an appropriate height above the substrate to measure representative air temperature in the heated zone.
Probe placement calculator
A starting position.
Measured for your setup.
You must use a dimming or pulse-proportional thermostat compatible with your panel. Position its probe directly beneath the ReptiRad.
Measure vertically from the panel’s lower heating face to the top of the substrate directly below it. Enter that clear distance, rather than the enclosure’s external height.
Your initial probe position will appear here.
Guidance only: obstructions, ventilation, enclosure materials, room temperature and other setup factors can affect heat distribution and results. Check actual temperatures throughout the enclosure and adjust probe placement and thermostat settings to suit your species.
This calculator places the probe four-fifths of the measured distance down from the panel, leaving one-fifth above the substrate. It is a simplified interpretation of the manual’s examples, and does not replace the manufacturer’s instructions or define a safe clearance.
Secure the probe so the animal cannot move, cover or damage it. Measure temperatures throughout the enclosure and adjust the probe position and thermostat settings for your species. Run the complete setup for at least 24 hours and verify stable, appropriate temperatures before introducing the animal.
Manufacturer’s example positions
The original figures below are retained for reference. They use enclosure height, so they will not necessarily match the calculator’s 80% estimate based on your measured panel-to-substrate distance.
| Enclosure height | Probe above substrate |
|---|---|
| 60cm / 600mm | Approximately 8cm / 80mm |
| 90cm / 900mm | Approximately 13–18cm / 130–180mm |
| 120cm / 1200mm | Approximately 20–30cm / 200–300mm |
These are starting positions, not panel clearances or temperature settings. Secure the probe so the animal cannot move, cover or damage it. Measure actual temperatures in the different enclosure zones and adjust probe position and thermostat settings to suit the species.
Room temperature affects enclosure temperature. Check conditions regularly and adjust settings as necessary. At unusually low or high ambient temperatures, the panel may not maintain the desired conditions; continue checking that temperatures are suitable for the animal.
05
Before introducing an animal
Run the completed setup with the other devices normally used in the enclosure for at least 24 hours. Confirm that temperatures remain stable and appropriate for the species before introducing the animal.
Check that the animal cannot contact surfaces at dangerous temperatures, reach the cables or put force on the panel. During normal use, periodically inspect temperatures, probe position, panel fixings and the power cable.
06
Care, cleaning & faults
The manufacturer declares an IP64 protection rating for the panel. Do not immerse it in water. Keep the inline connection, plug and other electrical connections outside the enclosure, protected from water and moisture.
Cleaning
- Disconnect the plug from the mains and allow the panel to cool completely before cleaning or other work.
- Use a soft, damp cloth. Keep liquids out of electrical connections.
- Do not clean parts with tools, solvents, aggressive detergents or other cleaning liquids. Never immerse the appliance.
If something is damaged
Do not cover, drill, modify, dismantle or tamper with the product. If the cable, connector or panel is damaged, or operation is abnormal, stop using it immediately and contact the manufacturer or an authorised service centre. Do not attempt repairs yourself.
The manufacturer’s manual states that incorrect mounting by the installer can cause serious harm to animals, people and property, and excludes manufacturer responsibility for incorrect installation.
07
European model specifications
| Model | Power | Supply | Insulation | Protection |
|---|---|---|---|---|
| ReptiRad 40 | 40W | 230V ~ 50Hz | Class II | IP64 |
| ReptiRad 80 | 80W | 230V ~ 50Hz | Class II | IP64 |
| ReptiRad 125 | 125W | 230V ~ 50Hz | Class II | IP64 |
| ReptiRad 220 | 220W | 230V ~ 50Hz | Class II | IP64 |
These electrical specifications apply to the European models in this manual. Confirm the specification and plug type of the product sold in your country, including white-label versions.
08
Warranty & manufacturer
The supplied Italian manual states a 24-month warranty from the date of purchase against material or manufacturing defects. It provides for free repair or replacement of components found to have an original manufacturing defect.
The stated warranty does not cover defects caused by tampering, negligence or improper use. A product returned for repair must include an invoice or receipt proving the purchase date. The manual assigns outbound and return shipping costs to the buyer and excludes responsibility for harm to people, animals or property caused by failure to follow its warnings and instructions.
This is a translation of the warranty stated in the supplied manual. For the terms applicable to your purchase and country, contact ReptiRad or your retailer.
Made in Italy by Alper
ALPER S.R.L. SOCIETÀ CON SOCIO UNICO
Via San Giovanni Bosco 50
36022 Cassola (VI), Italy
Alper’s certified management systems
- ISO 9001Quality management
- ISO 45001Occupational health & safety
- ISO 14001Environmental management
09
Disposal
The manual’s crossed-out wheeled-bin symbol identifies electrical and electronic equipment that must be collected separately from mixed household waste. Its disposal notice cites EU Directives 2012/19/EU and 2011/65/EU.
Return the equipment to a municipal collection centre or an appropriate retailer collection scheme, including the “one-for-one” or “one-for-zero” arrangements described in the manual. Separate collection and recycling help recover materials and reduce harmful effects on the environment and health.
Still have a question?
Tell us your panel model, country and enclosure details so we can help with your setup.
Contact ReptiRad ↗